
Good friend of mine ask me about Photoshop CC tutorial few days ago and I think this gonna be the best moment to answering his question. Back few years ago my phone was ringing when a lovely voice ask me to fly to Bali for portrait shoot for group of friends in such wonderful resort called Suluban Cliff. Actually it’s a short arrangement because I must catch my flight in just few days.
Group of sexy ladies ask me to shoot for her portrait, what’s better than this?
I’m not going to show you about the photo session here because what I’m going to tell you today is about Photoshop CC tutorial and I sure that every of you will be able to use it for your post production work. In case you got the earliest or latest Photoshop series and it doesn’t matter at all because working in Photoshop will be the same in general.
But in case you gonna see my final work than I will always feeling glad to show it to you on 6 Gorgeous Ladies Session page! Dear lovely photographer my name is Bima and thank you for visiting my page, before I share about my Photoshop CC tutorial so I would like to share to you with some information that could help you know more about this kind of work.
- I enjoy to work with optical mouse but if you want to make it easier than having a Wacom Intuos 7.9”x 6.3″ will be better option.
- I’m a Nikon manic so if have deep pocket than Nikon D850 is the best gear for today but in case you just starting your photographer career, cheap DSLR like Nikon D7100 is also cool!

My 1st Experience of Using Photoshop
I was remember when I had my first impression about using Photoshop 11 years ago and I think that this software is scrap and difficult to work on but after few years later than I love it so much because I think I could improve my photos by using it. There are a lot of feature options that we could use to make our wedding photos better with retouch it as natural as we can so we definitely gonna use it to make an outstanding photographs that will make our couple impressed!
When Martin Evening creating his amazing book called, Adobe Photoshop CC for Photographers I wondering that this tutorials will open so many photographer’s eyes that using a Photoshop is just like work with fun as everyone will able to use it as simple as making a great coffee in the morning.
So as a person who avoid Photoshop 11 years ago and belong to a guy who falling in love with this software I could say that you can made it for your own works. Be ready because I’m going to start this Photoshop CC tutorial for you!
Photoshop CC Tutorial for Everyone!


What I’m going to share today is about how to improve my photo above from the left into the right. It just a simple pose that I made for my client, Irina, who standing by on the iron fence and wearing a nice sexy black dress that everyone could have.
1 – Selecting Some Parts in Detail
When I just open the original file in my computer (the left photo) and begin my post production journey than I will select some parts in detail to make sure everything will be better. On that photo I was selecting some parts such as:
- Hair
- Skin (hands, leg, face, and upper chest)
- Black dress
- Sun glasses, and
- The background
If you want to select some parts in detail than I highly suggest you to use the feature called “Lasso Tool”, you don’t need to put in precise but as long as you can select it than it’s done. When you’re done with selection those part than make sure you use the feature called “Feather Selection” or Shirt F6 that could make your selection area smoother and this is why I’m telling you for it’s OK to select un-precisely before.
When you use feather selection than you must type some number to adjust the feature, just keep trying to make it familiar to use.
2 – Enhance the Colour
After you could select the parts than the next thing that you must do is enhance the colour and make it better due to your own style. By the way I love to make my photos as natural as and I sure that I want to make it more glamorous to see from the angle of my clients.


When you see the screenshots above than you will see that I’m selecting Irina’s hair and adjust it to make darker and contrast. There is a part in the front that have a brown colour that will come better when I increasing the number on Saturation. So next job that you must do is work for the same thing in some parts that you already selected.
Another tools that you can use for enhancing the colour is “Level” or CTRL + L, like you see on the above photo, I try to select the black skirt and dress than decrease the level bar so I will make the dress darker easily.
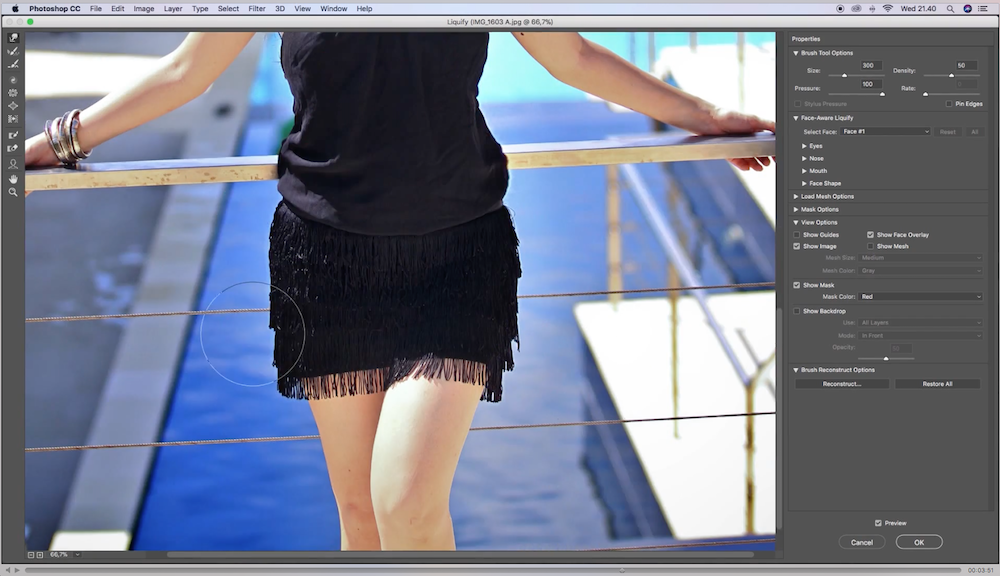
3 – Try to Use Liquify
It’s a bit tricky to use this feature but to improve my photos than sometimes I use it. “Liquify” is a feature that you can use to re-shape and make some part in more detail. If you see my screenshots below than you will see that Irina’s body is already perfect but wearing those dress will made some of her body part looks bigger or wider.
So what I’m doing here is re-shape her body and make it as outstanding as I can so generally I’m going to let her see the body sexier than ever. If you see on my video below than you will see I’m adjusting the skirt, body, hand, leg, and the dress, surely you will see this photo will improving better than before so I hope that my client will happier when see it at the album.
Another articles from me that could be useful for you
Download My Full Photoshop Action
You may see some of my free tutorials in Youtube or in this blog but if you want to learn more in detail and see directly how I retouching photo by using Photoshop than you could download my own Photoshop action below,
It’s All Done But Let Me Show You How to Work in Real
Having a Photoshop CC tutorial will much better if I could share some step by step video for your own guidance and yes I already record my screen so you can follow what I’m doing here and simply do it as I said. Down here you can see how I work in Photoshop CC and improve Irina’s ordinary portrait photo into an outstanding final result that will impressed her when see it at the end.
Last, I will say thank you for you in advance because you read my Photoshop CC tutorial article till the end and I hope what I share today will help you to figure out how to use this software better on your photography job.
[AdSense-A]