Hi lovely people today I wanna show you about tips for self photography that I’ve made during my previous vacation in Bali Indonesia. By the way if it’s gonna be your first time to know me than I want you to know that I’m so honour to have you here and I hope I could deliver good information about photography.
My name is Bima and I’m an Indonesian based wedding photographer, since in University I was falling in love with everything that related to capturing moment. Since I learn about composition back in 2004 I was shooting using an old Nikon FM10 and Nikon F80 which still using 35 mm film and everything that related to it no matter it just fixing the line in the view finder till getting deeper about exposure and aperture than all of them are looks so cool.
Before I share about tips for self photography photo retouching than I want to share first about how to make it for your own so lets check out for tips below:
1 – Make it By Your Own
Seriously I personally made my self portrait photo for majority, I know it seems to be difficult especially when you can not flip your LCD but that;s gonna interesting. If you want to make self photography without any help from others than you definitely need some tools, so check several tools that I recommend to make it by your own:
- Gorilla Pod, it’s a good tools when you just want to make your own self photography portrait scene. Here you don’t need to use any big stand because when you use this pod than you can easily put your camera at any building part like fence, stairs, or even just a table right in front of you
- Mirrorless camera, having such wonderful entry level camera like Fujifilm X-A7 that cost only few hundred bucks is quite reliable for this needs even you might use any higher level series of camera if you have more budget on your pocket
2 – Ask Somebody to Make It for You
Here in this story I ask my wife to take my personal photo while playing together with my daughter, it’s really easy and fun and you don’t need to be to concern about the result because present camera is so cool and get a focus detector that will make anyone feels easy to shoot.
In fact, Nina always hold our Canon EOS M series camera while we traveling, it’s a small camera so it’s generally handy to bring and everybody will able to shoot beautifully with its brand new system and if you want to see how this tiny camera works well during our traveling than you might consider to read my previous story below:
- Why This USD200 Mirrorless Camera is Enough to Document Your Holiday
- How to Generate Passive Income by Selling Travel Photos
3 Lazy Steps for Self Photography Photo Retouching Using Photoshop
I wanna back to the main topic on this chapter and it’s about tips for self photography photo retouching using Photoshop. So true that you may use any earlier or lates Photoshop series but now I’m using Photoshop CC on my computer that helps me so great during past few years to work in my own wedding photography business.
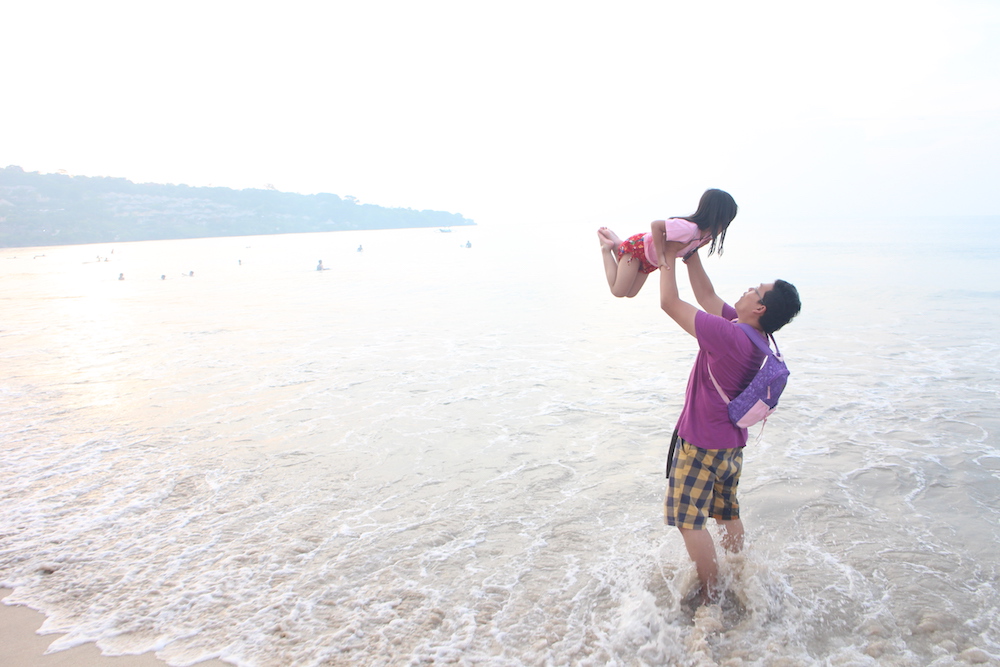
This is the original files and let me give you with some data that you might consider below:
- Exposure time 1/200
- F number 4
- Focal length 18mm

What I did is taking my daughter up and I ask her to flip her leg so it will impressed everyone that she jump so high, you might use this kind of tips too to make any of your jumping session looks so awesome. This photo is taken in Legian Beach, Bali where we waiting for our seafood dinner, so I spend very good time during this sunset playing with my daughter while my boy is playing with the beach sand.
If you see my photo above than there are few things that I’m gonna fix to like:
- Over exposure for the sky, I don;t think so I could make it better
- Over exposure on the beach and
- Simply just an ordinary photo that come through raw files, this is what I’m gonna improve more!
Let me explain more for what I’m doing here!
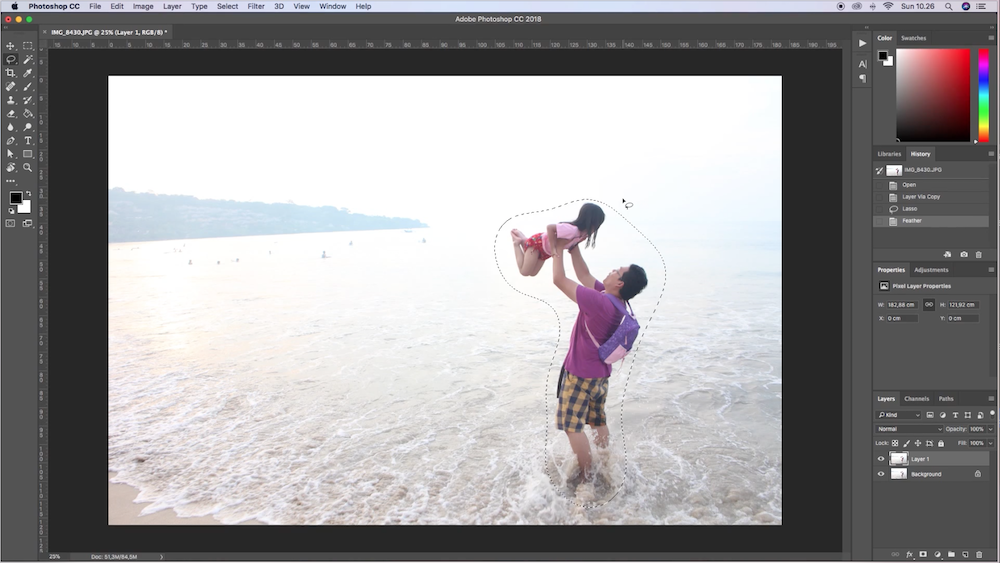
1 – Selecting Me and My Daughter’s Body

When you selecting some part in your photographs than make sure continue your work with feather selection because it will make everything looks smoother. Some friends of mine are recommend me to work with Wacom Intuos so you might consider to get it too for your own investment. One cool thing that you must remember is you don’t need to be precise in selection something so just make it as fast as you can, just like what you see on the screen shots above.
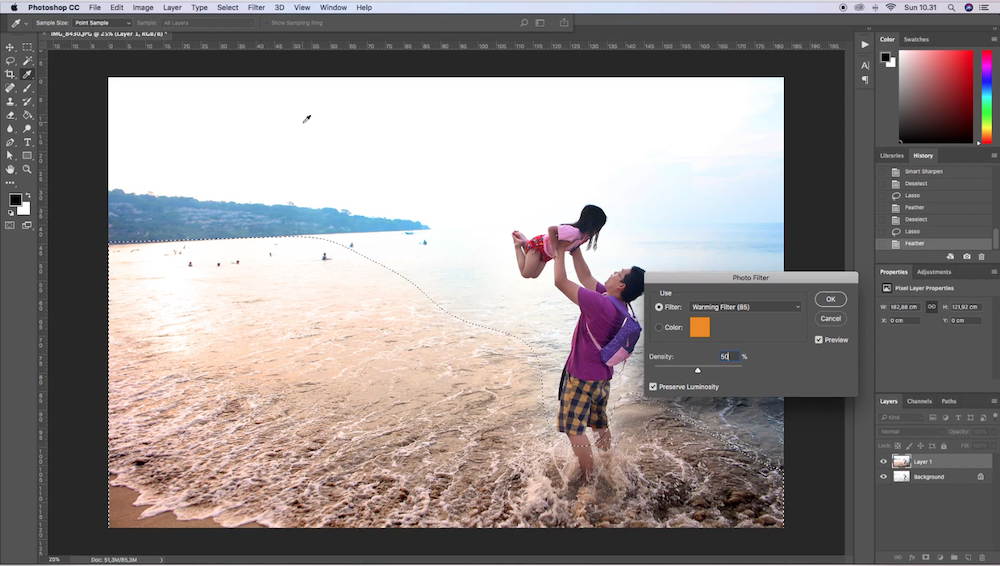
2 – Give More Colour by Using Photo Filter

What I imagine before working on this self photography photo retouching is I want to deliver the sunset ambiance just like what I saw in Bali so here I’m thinking to add some colour by using an orange photo filter. So I selecting the beach, water, and waves that splash around my foot than using feather selection to make it better.
Once I got some selected part than I open the photo filer and put an orange colour effect for it, not too much cause I only put 25 on those bar and it’s looks better now.
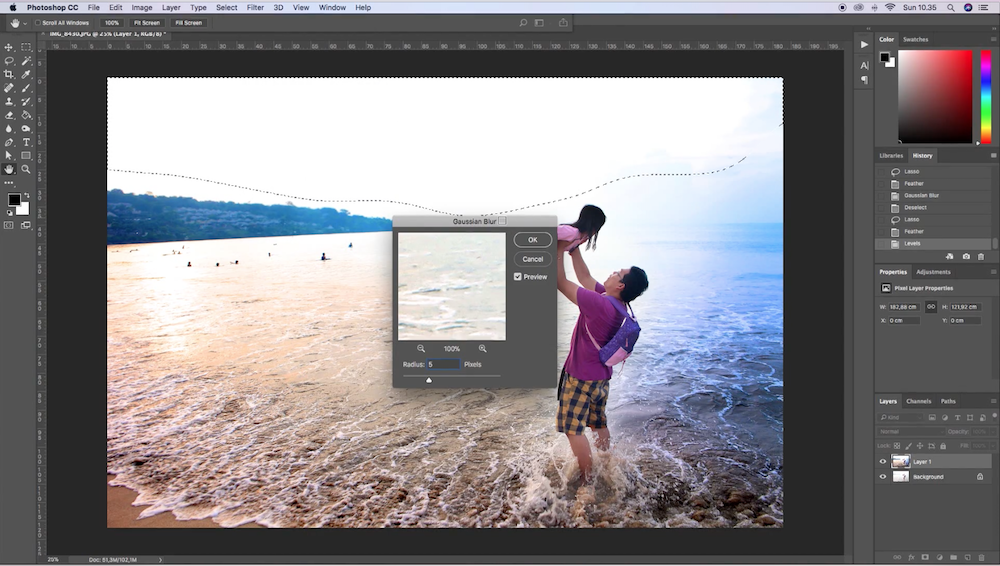
3 – Double Check for the Exposure

I already told you that I can’t do more for the sky because it’s already bad from the beginning so what I did is double check for the exposure on the hill behind me, ocean waves that splash on my legs, and the most important thing are me and my daughter detail. I wanna make it as simple as I can so after selection those parts and use feather selection than I use the level feature to fix it.
When you use to fix the exposure by using Level than all you need to do is just increasing or decreasing the bar and due to my case so I will reduce the brightness for little bit. After giving a short photo retouching on Photoshop and fix everything that I already mentioned before than I got this photo below…

It’s all done!
Yes that’s it and it’s all done just less than 15 minutes so I think it seems to be easy and you could do it for your own and all you need to do is making a great practice every day and seriously you will be better in the next few weeks.
I want to take you into better impressions about these 3 tips for self photography photo retouching using Photoshop so I wanna show you short timelaps that I’ve made for you,
How to Edit My Vacation Portrait Photo with Photoshop
Dear lovely people today I wanna share how I edit my Bali vacation portrait photo by using Photoshop. It is so simple cause all you need is improving selecti…
If you want to learn more in detail and see how I work step by step start from I open the files without any disruption on it than you could download my Photoshop Action #2 while I’m editing the bridesmaid portrait photo in such wonderful wedding location in Uluwatu, Bali.
So I hope you guys enjoying my tips for self photography photo retouching, go subscribe on my Youtube channel and simply turn on the notification bell because I always make a content every week related to photography and post production. I’ll see you soon guys!

