Bringing LED dimmable continuous light in my bag is one travel checklist that I must do before take a sleep in a night before I go for photo session, this simple gear is awesome for any purposes. Hi photo and video artist my name is Bima and thank you in advance for coming into my blog, today I wanna share to you about why I love to bring LED dimmable continuous light on every outdoor photo session that I have, in more further I will also give you some simple tips about how to use it properly to make an outstanding result.
When I’m going for pre wedding and wedding photo shooting no matter it’s gonna be at outdoor or indoor area than having such easiest lighting set up is one cool thing that I always do, in fact I’m an available light maniac but when you have a photo session than you might be dealing with any situation that need an additional lighting set up, it could be in a dark area or you just gonna give some special effect of fill in light to your clients. Surely you can bring your external flash too but using LED dimmable continuous light is another photography and videography technique that could you coukd try. Before I make some list about recommendation than let me show you how beautiful this technique is.
Why I Love Using Dimmable Continuous Light Better Than Flash?
I ever wrote about off camera flash technique couple months ago and got wonderful experience and result through it but generally I love dimmable continuous light better, through this article today let me share to you for what I know and the reason why I love using this continuous light during my photo session:
1 – You can learn easier
Best thing about using LED dimmable continuous light is you can see the light direction that’s why there is a warm modelling light on soft box or any studio lighting except the flash it self because those light will help photographer to see the direction. When you using continuous light than you definitely can see the light direction just before you start to click your shutter. Back few years ago I’m not good enough to use lighting, rather than learn so hard about it than I’m focusing my self to learn more about shooting with available light. It means that if I got sun light than I will use it but if I shoot at night party than I will use big aperture lens set up to fix that challenge.
If you are a person who able to learn fast by using off camera flash than it might be good for you but for some person including me, learning about flash technique in studio is confusing. I was remember that my mentor teach me about using 1 or 2 light source, set up the power, and adjust the light stand heights. I personally think that this kind of technique will works well if you shoot at indoor location and got some assistant that will help you as well. In some big cities like New York or Jakarta than you can easily can find a lighting assistant that gonna help you but if you shoot at some other place than you must do everything by your self.
By learning to see light direction instantly than you can imagine how your photo will looks like, dimmer up your light to see it clearly and it help you as well to shoot something.
2 – You can shoot “cheaper”
I know that it might be a dumb reason for someone but this is so true, by using continuous light technique than you only need those light it self.
When you use off camera flash shooting than you need some wireless trigger for your own which is mean you must buy those things just to fire up your shutter. By using dimmable continuous light technique than you can simply power up your dimmer if you need more light coming in and do the opposite work to reduce the power. When I learn photography at the beginning I spend hundred of bucks just to buy wireless trigger and it waste my time even finally I got the most powerful and reliable trigger for my studio, surely I will write the recommendation in very soon.
3 – Don’t have an assistant, it doesn’t matter!
I personally recommend you to have continuous light for shooting alone because you don’t need any further assistant especially when you just starting your career. On the lists below I recommend any continuous light that compliment with light stand but if you don’t have it too than you can put those light at any steady surface (my favourite is stone and table).
Having such assistant just to hold a lighting will make your cost higher, if you just shooting nearby your house than it ain’t problem but when you shoot for overseas photo shoot than you cost will burn thousand of dollars just to have an assistant. For the whole photo session that I did, I only ask Nina my wife to be my make up artist and personal assistant and yes she also help me to make a behind the scene video for my assistant. She doesn’t know photography in advance because she just ordinary woman that want to help me as a husband and business partner.
If you see my previous article about creating DIY photography studio box you will see my behind the scene snaps too when I shoot coffee bean right on my black fridge, there I hold my Canon EOS M on the right than hold the LED continuous light on my left hand.

How to Use LED Dimmable Continuous Light to Improve Your Photo Result
In fact, lighting is a cool tools that you can use not only to bring more light into your object or couple but it will give your photo more chatacter and better ambiance. Trough the light you gonna make shadow and dimension that will make your object stand out. Down here I will give you two examples and tips about how to use artificial continuous light for shoot something.
1 – Shooting for Wedding Ring

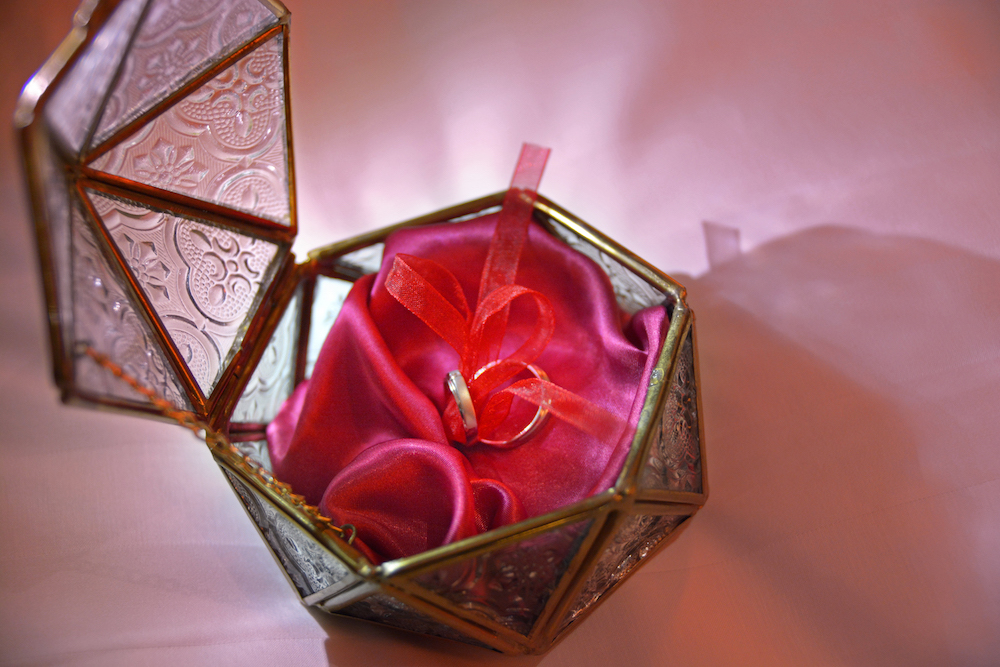
When I shoot this wedding ring I simply put those ring inside the golden box which come in very good shape and clear glass. Right inside the glass there is a pink-purple satin fabric that belong to the base and that’s gonna be the point. If you ever touch satin fabric than you must know that this kind of fabric will reflect something. It’s pretty simple, here you also see that I’m not using any light gel or filter which mean the light colour will be white as the original one but the end result was impressive. See that stunning colours, it’s pink, purple, and gold that come originally through the box and satin fabric.
It’s all about simple technique for shooting in tight time, all pink-purple ambiance light that spread on the bed sheet on my photo above is just reflection from the satin fabric, it’s nice and feels so romantic in my final album. To make this kind of photo you can use light pen which you also can use for checking your car’s engine too, LOL but this kind of gear are truly worth it to buy. Above photo is just a sample that I personally did in my wedding photo session but you can grow your creativity in advance by using this simple light pen.
How to Shoot
- Put the box on a steady surface – it’s on a bed
- Give more light by using Streamlight 65058 White LED right from the top – I hold by my self with the left hand
- Take a shot!
2 – Shooting for Bride in a Dark Room

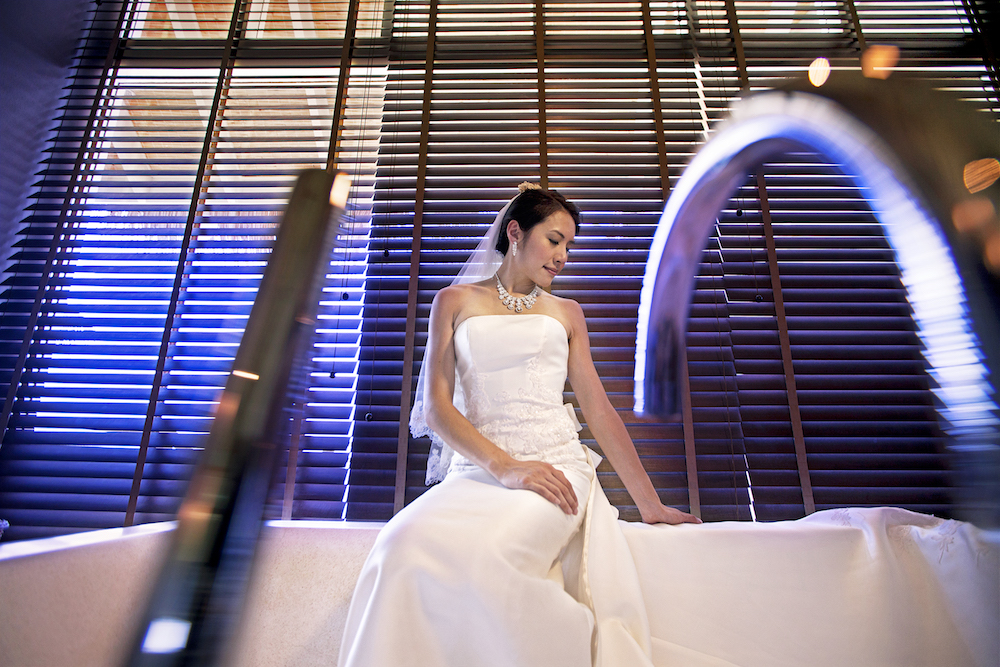
I was quite stuck when shooting under the harsh sunlight in Maldives which is make my skin burn just within an hour of session. I saw my bride’s face already getting sweat so I choose to asked her come into her room, get a chilled ice water and than pursue her to go into some nice room and we got the bathroom there. It’s quite nice place because there is an AC inside the room but the next challenge is coming, this room is quite dark even we still get a nice window light from behind but I totally need more lights that could coming into her face, it’s quite challenging but this is what I do to fix this situation.
When shooting in indoor room like this you might need more light while you hold LED dimmable continuous light with left hand than turn on the room’s light it help you to give more hard light for the hair and face and it gonna brighter these specific body part like neck and upper lips.
How to Shoot
- I ask my bride to sit right inside the bath tub
- I go to another side and make my self as low as I can
- Holding my camera with right hand and hold Video Light Photo Dimmable 176 LED Panel on the left
Top 10 Dimmable Continuous Light That You Can Consider to Buy
From the cheapest till the most outstanding dimmable continuous light that you can use for taking an outdoor or indoor photo and video session will be listed here. It gonna be awesome for you kind business and hobby so keep in touch and enjoy for what I recommend here:
1 – Streamlight 65058 Stylus with White LED
I mentioned this cool and simple dimmable continuous light for taking a cool wedding ring above, it just like a pen and you can keep it on your pocket. It comes with various colour like black, gold, silver, and red – blue and with high intensity of 100,000 hour of using than you can bet for this cool LED light for your photo and video session. If you took it for an outdoor session than Streamlight is extremely useful because it’s a water-proof light and finish with non-slip grip materials.
Pros. about Streamlight
- When they talk about 100,000 hours than normally you can use it for almost 10 years
- It produces a large luminescent cone, brightest at the centre and really useful if you are a doctor
- Super bright at any situation
- It won’t accidentally turn on and burn your battery up
Cons. about Streamlight
- Doesn’t work well if you expecting the result like torch
2 – Dimmable 176 LED Panel Light
I love this Dimmable 176 LED Panel light and always bring this awesome artificial lighting system at any photo session both indoor and outdoor. If you see my photo result above than you could imagine that this light work so well especially in a dark room like bathroom than hell yeah the final result was incredible. After using it for over than 5 years and bring it on overseas photoshoot than I still could telling you that this light is way worth it to buy period!
Pros. about it
- Works superb at any location of photo session especially indoor and dark room
- Quite small on a camera bag or light backpack
- Shine so bright and produce high quality lighting for filling on the face
- Dimmable feature is really helpful to adjust the light power
Cons. about it
- Adapter is sell separately
3 – LimoStudio 160 LED Video Light
Bit way better than the previous one and this Limostudio 160 LED comes with great quality, I ever use this kind of series and all the gel or filter colour help me so much to work on studio and dark room. It comes with White, Yellow, Blue, and Pink filters than compliment with a nice hard case that will help you to keep it in safe. Surely I bought the earliest model that come without hard case and it comes with a lot of bad experience when I drop it on the street so this case will really helpful.
Pros. about it
- Hardcase is my number one pros about it, really helpful to keep your lighting safely
- Comes with various gel even you might be use the blue and yellow more often
- Come with superb illumination quality, it was so bright
- Compact to bring anywhere
Cons. about it
- It mades from plastic so once you hit something on it than it will broken, be aware on battery port, it’s critical
- Battery durability is not quite excellent
4 – Set of 2 Dimmable 5600K USB LED Video Light with Adjustable Tripod Stand
Considering to shoot at outdoor area and wanna bring more lights into your scene, surely this Set of 2 dimmable LED light come as your answer. Sometimes one light only can use for fill in but when you have two on your own than it gonna incredible. Wanna hear more cool thing about it, it comes with 8 filter white, red, blue, and yellow which is come in two for each colour. The stands, it amazing when you only work alone or only have one assistant that accompany you on your session.
Pros. about it
- Come with 2 adjustable light stands
- You gonna have 8 filters or colour gel in total
- Come with superb illumination for indoor and outdoor scene
- 180 degree adjustable light, help you as well on your session
Cons. about it
- Stands are thin so don’t expect too much for strength
- Not recommended for an extreme location
5 – Dazzne Desk Mount LED Video Light C-Clamp Stand Kit 2 Pack
Expecting more powerful LED light for in house video production? you must be consider with this Dazzne desk mount LED system. When you got an illumination power output up to 45 watt in 15,4 inch large panel than you always can bet with high quality result. The cool thing is you also will get light controller on this package and great lighting colour temperature from 3000 kelvin with yellow colour to 5800 kelvin for the white one. Through this amazing video light you’re not only able to shoot for portrait but also for larger object like statue or even simply brightening your room, LOL but seriously.
Pros. about it
- With large LED panel and set of 2 lighting than you can improve almost every scene that you gonna make
- It use for desk too
- Amazing features on it and cool brightness controller
- Light to bring everywhere
- You could set as a manual controls
Cons. about it
- You must trying by yourself or read some other guidance because there is lack of documentation on this package
6 – Dazzne 600 LED Video Light Panel
No matter you wanna make your own selfie vlog or shooting for portrait model than Dazzne 600 LED light is your next level illumination system. WIth 40 watt output power, 4 part of barn doors than you can set your light direction properly. Through this package you gonna get 2 gels or filter colours the white and yellow and trust me due to 5 years of using this kind of dimmable light than those 2 filters are the most thing that you gonna use so often.
Pros about it
- Come with super bright colour and excellent quality
- There is an easy power dial from 1% to 100% even 25% already works well
- Easy to use by everyone who works at indoor area or mini studio
Cons about it
- Diffuser or filter can get scratch so please remind about it
- Please note that battery sold separately so make sure you consider to own that too
7 – GVM RGB Video Lights with APP Control
If you wan to set up a mini studio for portrait or stock photography than GVM RGB light is cool thing that you could buy. Since it comes with 3 sets of 8 special lighting scenes like TV, candle, cop car, lightning, paparazzi, disco, party, and bad bulb than you always can make a different light effect for your own creativity. Please remind also that GVM is provide CR197 RGBWY five colour lamp beads so you can use independently without affecting each other.
Pros. about it
- You could control everything with an apps on your hands
- Adjustable light stand are provided
- Easy to use even for someone that know nothing about photography and videography
- Flexibility of temperature range’
Cons about it
- Way more expensive than the others
8 – ESDDI 176 LED Video Light
I shared a references about reliable dimmable continuous light that you can buy above but just be happy because here I got another references that you could compare with previous one. It’s ESDDI 176 LED that also come in small size so you can simply put it on your travel bag. With 5 gels Red, Green, Blue, 3200 kelvin, and 5600 kelvin so you can make a trial and being more creative with this lighting set up and in more further you can set it up right from 10% to 99% illumination power.
Pros. about it
- Come with 5 colour gel
- Small and easy to bring for travel
- High quality illumination and superb features
Cons. about it
- Unit will feels quite warm just within regularly use
- Please remind that DC adapter is not include, make sure you check DC adapter references above
9 – Pixel G1s RGB Video Light
This Pixel G1s RGB coming with 80 LED light panels so you definitely can use it for indoor photo shoot both portrait or macro objects, the cool thing is it provides you with colour saturation adjustable from 0% to 100% and also brightness dimmable from 0% to 100% too. Since it mades from metal than it isn’t look like cheap and junk tools and the most important thing is you can keep it safely even using it for an extreme situation.
Pros. about it
- Some part made from metal so it’s quite strong for daily use
- Great battery durability
- USB-C rechargeable for fast charging (cable included)
- Light weight
- Worth it to buy even comparing with other pricy lighting system
Cons. about it
- Body will be overheated soon when using maximum power
10 – Suptig Underwater Lights with 84 LED
I surely put this Suptig underwater light on my last lists because it’s a WATERPROOF gear that you can use for being more creative on your work. In fact this reliable light could be steady up to 50 meter deep so if you love diving and take a shots for corals than this could be your best friend ever. Surprisingly, some people also use this Subtig for bike headlamp and tent downlight because when you have such portable charger too than you can charge it immediately.
Pros. about it
- It’s waterproof up tp 50 meter
- Can be use by hand held, on the bike or as a downlight on your tent, it’s kind of multi gears for all
- Could be use for long durability such as about 2.5 hours for maximum power, 3,5 hours of medium power 5 hours for low power, and effectively up to 9 hours for SOS call sign
Cons. about it
- Its body is quite weak for extreme condition and hit
Last,
I really appreciate that you read all my guidance till end and I hope it will give you cool answer when you looking for recommendation of dimmable continuous light. Just to give more help about those conclusion of cool lights so let me give you the lists below:
- Streamlight 65058 Stylus with White LED
- Dimmable 176 LED Panel Light
- LimoStudio 160 LED Video Light
- Set of 2 Dimmable 5600K USB LED Video Light with Adjustable Tripod Stand
- Dazzne Desk Mount LED Video Light C-Clamp Stand Kit 2 Pack
- Dazzne 600 LED Video Light Panels with APP Control
- GVM RGB Video Lights with APP Control
- ESDDI 176 LED Video Light
- Pixel G1s RGB Video Light
- Suptig Underwater Lights with 84 LED
If you shoot for compact wedding photography industry than I personally you to but light like LimoStudio or similar, while I use this kind of model on my photo session, this gear only give you 2 colour gel yellow and white which is way more enough for your photo shoot needs. Having an outdoor and overseas photo session need a compact luggage so I often fly with no luggage and only bring cabin backpack because I wanna move fast after the flight landing without stuck on the conveyor belt for waiting my luggage.
Buying light with the stands seems to be cool but it makes your luggage heavier and I don’t recommend you if you shoot alone or with one assistant stand by. Good light stand use to made by metal or good carbon that will your journey look so taught and I personally love to travel in light.
In fact I love my job better than others so if you still got time and read my story about bring the whole family (wife and 3 kids) while I shoot for stock photography in Singapore than I travel in super light. You may know that every flight passenger are allow to bring about 7kg cabin bag and this is what we had during our journey. 7kg x 4 person means 28 kg and we think it’s quite enough for bring simple photography gear and some clothes taht we could wash on our apartment.
Once again thank you for stumble upon my blog and I hope you still visiting my blog regularly because I post new article every weeks that related to photography and travel. See you soon guys and God bless with everything you working at, cheers!

